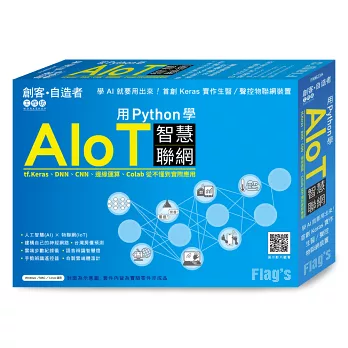
最近我在閱讀市圖借來的 "用 Python 學 AIot 智慧聯網" (施威銘研究室, 2020) 這本書時, 在第四章看到 ulab 的介紹, 原來 MicroPython 也有迷你版的 Numpy 可以用, 讓我躍躍欲試. 這本薄書其實是旗標出版的 "創客-自造者" 系列中的教材, 盒裝內還包括 ESP32-WROM 開發板與若干感測器模組與零件 :
此書特點是專注於利用 ESP32 開發板以 MicroPython 實作機器學習應用, 但因為 Numpy 太大塞不進像 ESP32 這樣的嵌入式設備, 所以有人就寫了 ulab 來代替, 如果要在 ESP32 上跑機器學習運算就會用到這個陣列運算模組, 其原始碼放在 GitHub :
ulab 的教學文件參考
注意, ulab 有許多版本, 用法與實作的函式範圍並不相同, 例如 CircuitPython 的 ulab 有實作 arange() 函式, 而原始 ulab 則沒有, 參考 :
但是 ulab 沒有編譯好的套件可直接下載安裝, 例如 ESP32 連接 Internet 後用 upip instal() 安裝會出現 "Package not found" 訊息 :
>>> import upip
>>> upip.install('ulab')
Installing to: /lib/
Warning: micropython.org SSL certificate is not validated
Error installing 'ulab': Package not found, packages may be partially installed
根據官網說明, 必須要將 ulab 與 MicroPython 原始碼一起編譯成韌體才行, 但看來這不是容易幹的活, 等有時間再來玩看看, 眼下最快的方式是從旗標網站下載書附範例, 其中含有旗標用 MicroPython 1.12 編譯好的韌體, 只要下載燒錄到 ESP32 板子上馬上就可以 import ulab 使用了, 下載網址如下 :
解壓縮 zip 後, 在 "韌體" 資料夾下就可找到名為 "esp32-20200512-v1.12-195-gb16990425.bin" 的韌體, 將其燒錄到 ESP32 開發板即可. 這個韌體是將 ulab 與 BlynkLib 等套件與 MicroPython 原始碼一起編譯而成的特仕版, 與 MicroPython 官網下載的韌體功能不同.
我用 Thonny 燒錄韌體過程都 OK, 但完成後卻讀不到串列埠而不能用, 不知原因為何 :


改用 esptool 於命令列燒錄就可以, 注意, 執行抹除與燒錄 Flash 指令之前要按住右下角的 ID0 Flash 鈕, 直到出現 % 進度時再放開 (D1 mini 則是要全程將 D3 接地, 完成後再拔掉) :

D:\ESP32>esptool.py --chip esp32 --port COM9 erase_flash
esptool.py v2.6
Serial port COM9
Connecting.....
Chip is ESP32D0WDQ6 (revision 1)
Features: WiFi, BT, Dual Core, 240MHz, VRef calibration in efuse, Coding Scheme None
MAC: 80:7d:3a:b7:a7:5c
Uploading stub...
Running stub...
Stub running...
Erasing flash (this may take a while)...
Chip erase completed successfully in 4.3s
Hard resetting via RTS pin...
D:\ESP32>esptool.py --port COM9 flash_id
esptool.py v2.6
Serial port COM9
Connecting........___
Detecting chip type... ESP32
Chip is ESP32D0WDQ6 (revision 1)
Features: WiFi, BT, Dual Core, 240MHz, VRef calibration in efuse, Coding Scheme None
MAC: 80:7d:3a:b7:a7:5c
Uploading stub...
Running stub...
Stub running...
Manufacturer: 68
Device: 4016
Detected flash size: 4MB
Hard resetting via RTS pin...
D:\ESP32>esptool.py --chip esp32 --port COM9 write_flash -z 0x1000 esp32-20200512-v1.12-195-gb16990425.bin
esptool.py v2.6
Serial port COM9
Connecting....
Chip is ESP32D0WDQ6 (revision 1)
Features: WiFi, BT, Dual Core, 240MHz, VRef calibration in efuse, Coding Scheme None
MAC: 80:7d:3a:b7:a7:5c
Uploading stub...
Running stub...
Stub running...
Configuring flash size...
Auto-detected Flash size: 4MB
Compressed 1479888 bytes to 939384...
Wrote 1479888 bytes (939384 compressed) at 0x00001000 in 83.6 seconds (effective 141.6 kbit/s)...
Hash of data verified.
Leaving...
Hard resetting via RTS pin...
用 Putty 連線 OK, 可見還是在命令列用 esptool 燒錄最妥當 :
ets Jun 8 2016 00:22:57
rst:0x1 (POWERON_RESET),boot:0x13 (SPI_FAST_FLASH_BOOT)
configsip: 0, SPIWP:0xee
clk_drv:0x00,q_drv:0x00,d_drv:0x00,cs0_drv:0x00,hd_drv:0x00,wp_drv:0x00
mode:DIO, clock div:2
load:0x3fff0018,len:4
load:0x3fff001c,len:5052
load:0x40078000,len:10600
load:0x40080400,len:5684
entry 0x400806bc
I (543) cpu_start: Pro cpu up.
I (543) cpu_start: Application information:
I (543) cpu_start: Compile time: Mar 6 2020 17:07:32
I (546) cpu_start: ELF file SHA256: 0000000000000000...
I (552) cpu_start: ESP-IDF: v3.3.1
I (557) cpu_start: Starting app cpu, entry point is 0x40082fb0
I (0) cpu_start: App cpu up.
I (567) heap_init: Initializing. RAM available for dynamic allocation:
I (574) heap_init: At 3FFAFF10 len 000000F0 (0 KiB): DRAM
I (580) heap_init: At 3FFB6388 len 00001C78 (7 KiB): DRAM
I (586) heap_init: At 3FFB9A20 len 00004108 (16 KiB): DRAM
I (593) heap_init: At 3FFBDB5C len 00000004 (0 KiB): DRAM
I (599) heap_init: At 3FFCC830 len 000137D0 (77 KiB): DRAM
I (605) heap_init: At 3FFE0440 len 00003AE0 (14 KiB): D/IRAM
I (611) heap_init: At 3FFE4350 len 0001BCB0 (111 KiB): D/IRAM
I (618) heap_init: At 40099A80 len 00006580 (25 KiB): IRAM
I (624) cpu_start: Pro cpu start user code
I (307) cpu_start: Starting scheduler on PRO CPU.
I (0) cpu_start: Starting scheduler on APP CPU.
MicroPython v1.12-195-gb16990425-dirty on 2020-05-12; ESP32 module with ESP32
Type "help()" for more information.
>>>
使用 ulab 前先用 import 匯入, 同樣取 np 簡名 (用法與 Numpy 一樣) :
import ulab as np
首先來檢視 ulab 內容 :
MicroPython v1.12-195-gb16990425-dirty on 2020-05-12; ESP32 module with ESP32
Type "help()" for more information.
>>> import ulab as np
>>> dir(np)
['__class__', '__name__', 'sort', 'sum', '__version__', 'acos', 'acosh', 'activation', 'argmax', 'argmin', 'argsort', 'array', 'asin', 'asinh', 'atan', 'atanh', 'averagePooling1D', 'ceil', 'conv1D', 'cos', 'det', 'diff', 'dot', 'eig', 'erf', 'erfc', 'exp', 'expm1', 'eye', 'fft', 'flip', 'float', 'floor', 'gamma', 'globalAveragePooling1D', 'globalMaxPooling1D', 'ifft', 'int16', 'int8', 'inv', 'lgamma', 'linspace', 'log', 'log10', 'log2', 'max', 'maxPooling1D', 'mean', 'min', 'ones', 'polyfit', 'polyval', 'roll', 'sin', 'sinh', 'size', 'spectrum', 'sqrt', 'std', 'tan', 'tanh', 'uint16', 'uint8', 'zeros']
>>> help(np)
object <module 'ulab'> is of type module
__name__ -- ulab
__version__ -- 0.26.8f
array -- <class 'ndarray'>
size -- <function>
inv -- <function>
dot -- <function>
zeros -- <function>
ones -- <function>
eye -- <function>
det -- <function>
eig -- <function>
activation -- <function>
conv1D -- <function>
maxPooling1D -- <function>
averagePooling1D -- <function>
globalMaxPooling1D -- <function>
globalAveragePooling1D -- <function>
acos -- <function>
acosh -- <function>
asin -- <function>
asinh -- <function>
atan -- <function>
atanh -- <function>
ceil -- <function>
cos -- <function>
erf -- <function>
erfc -- <function>
exp -- <function>
expm1 -- <function>
floor -- <function>
gamma -- <function>
lgamma -- <function>
log -- <function>
log10 -- <function>
log2 -- <function>
sin -- <function>
sinh -- <function>
sqrt -- <function>
tan -- <function>
tanh -- <function>
linspace -- <function>
sum -- <function>
mean -- <function>
std -- <function>
min -- <function>
max -- <function>
argmin -- <function>
argmax -- <function>
roll -- <function>
flip -- <function>
diff -- <function>
sort -- <function>
argsort -- <function>
polyval -- <function>
polyfit -- <function>
fft -- <function>
ifft -- <function>
spectrum -- <function>
uint8 -- 66
int8 -- 98
uint16 -- 72
int16 -- 104
float -- 102
>>>
可見不僅 Numpy 重要的函式都有實作, 連 SciPy 與機器學習的常用函式也納進來了.
呼叫 np.array() 可將串列轉成 ndarray 陣列 :
>>> a=np.array([1, 2, 3, 4, 5])
>>> a
array([[1.0, 2.0, 3.0, 4.0, 5.0]], dtype=float)
>>> type(a)
<class 'ndarray'>
不過 ulab 沒有實作 arange() 函式, 必須用 Python 的 range() 代入 np.array() 中 :
>>> np.arange(12)
Traceback (most recent call last):
File "<stdin>", line 1, in <module>
AttributeError: 'module' object has no attribute 'arange'
>>> a=np.array(range(12))
>>> a
array([[0.0, 1.0, 2.0, ..., 9.0, 10.0, 11.0]], dtype=float)
>>> b=a.reshape((3, 4))
>>> b
array([[0.0, 1.0, 2.0, 3.0],
[4.0, 5.0, 6.0, 7.0],
[8.0, 9.0, 10.0, 11.0]], dtype=float)
好消息是 ulab 有實作 linspace() 函式, 可惜沒有 logspace() :
>>> np.linspace(0, 10)
array([[0.0, 0.2040816, 0.4081633, ..., 9.591833, 9.795915, 9.999996]], dtype=float)
>>> np.logspace(0, 2)
Traceback (most recent call last):
File "<stdin>", line 1, in <module>
AttributeError: 'module' object has no attribute 'logspace'
有實作 zero() 但沒有 zero_like() :
>>> np.zeros(5)
array([[0.0, 0.0, 0.0, 0.0, 0.0]], dtype=float)
>>> a=np.array([[1, 2 , 3], [4, 5 ,6]])
>>> b=np.zeros_like(a)
Traceback (most recent call last):
File "<stdin>", line 1, in <module>
AttributeError: 'module' object has no attribute 'zeros_like'
有實作 one() 但沒有 one_like() :
>>> np.ones(5)
array([[1.0, 1.0, 1.0, 1.0, 1.0]], dtype=float)
>>> a=np.array([[1, 2 , 3], [4, 5 ,6]])
>>> b=np.ones_like(a)
Traceback (most recent call last):
File "<stdin>", line 1, in <module>
AttributeError: 'module' object has no attribute 'ones_like'
沒有實作 identity() 與 full() :
>>> np.full((2, 3), 3.14159)
Traceback (most recent call last):
File "<stdin>", line 1, in <module>
AttributeError: 'module' object has no attribute 'full'
>>> np.identity(4)
Traceback (most recent call last):
File "<stdin>", line 1, in <module>
AttributeError: 'module' object has no attribute 'identity'
但有實作 eye() :
>>> np.eye(4)
array([[1.0, 0.0, 0.0, 0.0],
[0.0, 1.0, 0.0, 0.0],
[0.0, 0.0, 1.0, 0.0],
[0.0, 0.0, 0.0, 1.0]], dtype=float)
也沒有實作 diag() 與 empty() :
>>> a=np.array(range(25))
>>> x=a.reshape((5,5))
>>> np.diag(x)
Traceback (most recent call last):
File "<stdin>", line 1, in <module>
AttributeError: 'module' object has no attribute 'diag'
>>> np.empty(4)
Traceback (most recent call last):
File "<stdin>", line 1, in <module>
AttributeError: 'module' object has no attribute 'empty'
ulab 也未實作隨機數模組 random :
>>> np.random.rand(5)
Traceback (most recent call last):
File "<stdin>", line 1, in <module>
AttributeError: 'module' object has no attribute 'random'
產生隨機數向量必須透過 MicroPython 的 rnadom 模組函式 :
- random.randint(a, b) : 傳回 a~b 間的隨機整數 (含 a, b)
- random.randrange([start=0, ] stop [.step]) : 傳回 start~stop 間隔之隨機整數 (不含 stop)
- random.uniform(a, b) : 傳回 a~b 間的隨機浮點數 (含 a, b)
- random.random() : 傳回 0~1 間之隨機浮點數
- random.choice(sequence) : 隨機傳回 sequence (list/tuple) 中的一個
- random.seed(s) : 設定隨機種子
參考 :
要產生隨機陣列要先產生 list 再用 np.array() 轉成陣列, 例如 :
>>> import random
>>> randomlist=[]
>>> for i in range(0,12):
randomlist.append(random.randint(1,30))
>>> randomlist
[4, 22, 19, 18, 14, 17, 5, 29, 14, 4, 11, 10]
>>> a=np.array(randomlist)
>>> a
array([[4.0, 22.0, 19.0, ..., 4.0, 11.0, 10.0]], dtype=float)
>>> a.reshape((3, 4))
array([[4.0, 22.0, 19.0, 18.0],
[14.0, 17.0, 5.0, 29.0],
[14.0, 4.0, 11.0, 10.0]], dtype=float)
雖然曲折點, 但還是能用.
最後來驗證一下此特仕版韌體是否包含 BlynkLib 套件 :
>>> import BlynkLib
___ __ __
/ _ )/ /_ _____ / /__
/ _ / / // / _ \/ '_/
/____/_/\_, /_//_/_/\_\
/___/ for Python v0.2.1 (esp32)
可見編譯的版本為 Blynk v0.2.1 版.
參考 :

